
Article: Gel Nails at Home for Beginners: Why Solid Gel Is the Easier Start
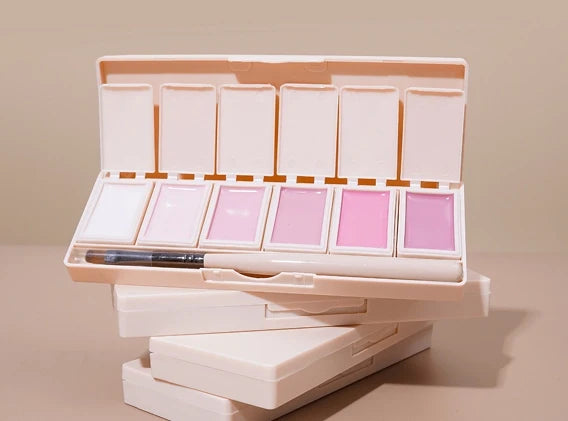
Gel Nails at Home for Beginners: Why Solid Gel Is the Easier Start
Quick answer: If you are new to gel nails, the main risk is not a messy finish. It is uncured gel touching your skin, which is how gel allergies usually start. Solid gel has a thick, balm-like texture that stays where you brush it and won't run into your cuticles, so it is easier to keep gel off your skin while you learn. This guide explains why that matters, how to do your first set step by step, and answers the questions beginners ask most.
Key facts
- Gel allergies develop when uncured gel comes into contact with skin. Dermatologists say the risk is higher with home application and under-curing.
- Solid gel is a gel polish with a firm, creamy texture. It holds its shape instead of flowing like liquid gel.
- It cures under a UV or LED nail lamp, like any gel polish.
- With good prep and a top coat, gel nails usually last 2 to 3 weeks.
- Ambedo solid gel is HEMA-free and TPO-free, vegan and cruelty-free.
Why do gel nail allergies happen?
Gel nail allergies happen when uncured gel touches the skin. Gel polish contains ingredients called (meth)acrylates. Once fully cured under a lamp, they are hardened and set. Before curing, they can sensitise the skin. Once someone is sensitised, the reaction can return every time they use gel.
The British Association of Dermatologists has warned that the risk is higher when people apply gel themselves, when the lamp does not cure the gel properly, and when products are not kept away from the skin. HEMA is the ingredient most often linked to these allergies, which is why many people now choose HEMA-free gel. You can read more in our guide to what HEMA-free means.
Why do beginners get gel on their skin?
Most skin contact comes from a few common beginner mistakes:
- Too much product. A thick layer of liquid gel can flood the cuticle or run down the side of the nail before you cure it.
- Working too close to the cuticle. It is hard to judge the edge when you are still learning brush control.
- Curing gel that is already on the skin. If gel touches the skin and is not wiped away first, it stays in contact while it cures.
- Under-curing. A lamp that is too weak, or a cure time that is too short, can leave gel soft and uncured.
How does solid gel help beginners?
Solid gel helps because it does not flow. You pick up a small amount with a brush and place it exactly where you want it. It stays there until you cure it.
- It won't run into your cuticles. The texture holds its shape, so there is less chance of gel creeping onto the skin while you work.
- You control the amount. You load the brush yourself, so it is easier to keep each layer thin.
- Less rush. Because it isn't moving, you can take your time on each nail.
Solid gel lowers the chance of skin contact. It does not make it impossible. You still need to keep gel off your skin and wipe away any mistakes before curing.
Solid gel vs liquid gel for beginners
| Solid gel | Liquid gel polish | |
|---|---|---|
| Texture | Thick and creamy, holds its shape | Runny, self-levelling |
| Flooding the cuticle | Less likely, stays where you brush it | More likely if the layer is too thick |
| Control | You load the brush, so you choose how much | Bottle brush carries a set amount |
| Learning curve | Takes practice to brush thin, even layers | Levels itself, but harder to keep off the skin |
| Curing | UV or LED nail lamp | UV or LED nail lamp |
| Wear time | 2 to 3 weeks with good prep | 2 to 3 weeks with good prep |
| Removal | Soak off with acetone | Soak off with acetone |
How to do solid gel nails at home: step by step
- Prep your nails. Start with clean, dry nails. File them into shape, gently push back your cuticles and lightly buff the surface to remove shine. Wipe each nail with a nail cleanser or isopropyl alcohol.
- Apply a thin base coat. Keep it off your skin and cuticles. Cure it under your lamp.
- Brush on your colour. Pick up a small amount of solid gel with your brush and spread a thin layer, leaving a tiny gap at the cuticle and side walls.
- Check before you cure. If any gel has touched your skin, wipe it away with a cleanser before it goes under the lamp.
- Cure, then add a second coat. Cure the first layer, apply a second thin layer for full colour, then cure again.
- Seal with top coat. Brush on a thin layer, run it along the free edge of the nail tip, and cure. If your top coat leaves a tacky layer, wipe it with a gel cleanser.
- Finish with cuticle oil. Massage it into your cuticles once your nails are done.
Always follow the cure times in your kit instructions. A lamp made for your gel takes the guesswork out of curing.
Start with a solid gel kit
If this is your first set, a kit with an LED lamp means you have everything you need from day one.

Ready to start
Solid Gel Starter Kit: 6-Pan Palette with LED Lamp
Six solid gel colours in one palette, with a 36W LED lamp, base coat, top coat and nail file.
Shop the 6-Pan Kit
Choose your colours
Solid Gel Starter Kit: DIY Palette with LED Lamp
Pick any three solid gel colours from 50+ shades, with a 36W LED lamp, base coat, top coat and nail file.
Shop the DIY KitWant to compare every option first? See all gel nail kits or browse solid gel nail polish.
Beginner FAQs
How do I do gel nails at home as a beginner?
Prep your nails, apply a thin base coat and cure it, brush on two thin layers of colour with a cure after each, then seal with a top coat and cure. Keep every layer thin and off your skin. A starter kit with a matched LED lamp makes the first set much simpler.
How long do gel nails last?
Usually 2 to 3 weeks. Good prep, thin layers and sealing the free edge with top coat are what make the difference.
Can HEMA-free gel still cause an allergy?
It can. HEMA is the ingredient most often linked to gel allergies, so HEMA-free gel lowers the risk, but other (meth)acrylates can also sensitise skin. The key habit is the same with any gel: keep uncured gel off your skin and cure every layer fully. If you notice itching, redness or swelling around your nails, stop using gel and speak to your GP or a dermatologist.
What should I do if my gel nails lift?
Don't peel or pick the gel off, as this can take layers of your natural nail with it. Gently file away the lifted section, or soak off the set and start again. Lifting usually comes from oily or shiny nails at the prep stage, gel touching the cuticle, or layers that are too thick.
Do I need a special lamp for gel nails?
Yes. Gel only hardens under a UV or LED nail lamp made for gel. Our starter kits include a 36W LED lamp. If you already own a gel lamp, you can buy the palettes on their own.
How do I use solid gel polish?
Pick up a small amount from the pan with your brush, spread it in a thin layer on a cured base coat, and cure under your lamp. Add a second thin layer for full colour, then finish with top coat.
How do I remove solid gel?
Lightly file the top coat, then soak your nails in acetone with foil wraps for 10 to 15 minutes. Gently push the softened gel away. Never peel it off.
Source: British Association of Dermatologists, Dermatologists issue warning about UK artificial nail allergy epidemic.

Written by Team Ambedo

Leave a comment
This site is protected by hCaptcha and the hCaptcha Privacy Policy and Terms of Service apply.